Chicken Photography: Wings, Roasts & Sandwiches Made Drool-Worthy
Search "chicken photography" and you'll mostly scroll past glamour portraits of backyard hens and prize roosters. This guide is about the other chicken — the crispy, juicy, sauce-slicked kind people actually order. Whether you run a fried chicken joint, a wings bar, a rotisserie counter, a chicken truck, or a poultry brand, the photo is the first bite. It has to deliver the crunch and the drip before anyone tastes a thing.
Here's the problem: chicken is one of the trickiest subjects in all of food photography. It's brown. It cools fast. The crispy skin that took real skill to build dries out and dulls under your lights. Point a phone at a tray of golden fried chicken and you'll often get something flat, greasy-looking, and weirdly sad — nothing like the dish that's steaming in front of you.
This is a complete, practical playbook for chicken photography that sells. You'll learn the five shots every chicken menu needs, how to light crispy skin so the texture pops, how to make sauces look glossy instead of gloopy, the bone-in vs boneless decision, and a 90-second AI workflow that turns a quick phone snap into a menu-ready image — no studio required.
Quick Summary: Great chicken photography comes down to texture, sheen, and color. Light crispy skin from the side or top so raking light catches every craggy ridge, keep a warm golden tone and a brushed-on sheen so the crust glows, and break up all that brown with pickles, herbs, lemon, and bright dips. Every chicken menu needs five core shots — the whole-roast hero, the stacked fried pile, the wings platter, the sandwich cross-section, and the hands-on drumstick. When you can't stop for a shoot, FoodShot AI turns a real phone photo of your chicken into a studio-quality, menu-ready image in about 90 seconds.
Why Chicken Is Sneaky-Hard to Photograph
Chicken behaves like an easy subject and then betrays you. It looks incredible on the plate, but the camera sees a very different dish. Here's everything working against you on a chicken photography shoot.
 Pale greasy fried chicken in a foam takeout box under harsh flat fluorescent light — a bad chicken photo before editing
It's brown on brown. Fried chicken, roast chicken, wings, tenders — gorgeous in person, but to a sensor it's a monochrome pile of tan and amber that reads muddy and flat. Without contrast and color, the eye has nowhere to land.
The crispy texture is the entire point — and the hardest thing to capture. Crunch is a feeling, and you have to make people feel it through a screen. Flat, head-on light erases the craggy ridges of a good crust and turns shatter-crisp skin into a smooth, plasticky surface. Get the light wrong and even perfect fried chicken looks soft.
White meat dries to a "grey flap." Chicken breast is lean, so it loses moisture fast and photographs chalky and pale. Dark meat — thighs and drumsticks — holds juice and reads richer and glossier on camera. (More on rescuing white meat below.)
Sauce is a tightrope. Too little and a wing looks dry and under-dressed. Too much and it reads greasy, with muddy puddles instead of appetizing gloss. The sweet spot is an even, light-catching coat.
Bone-in or boneless changes the whole story. A drumstick says rustic and craveable; a tidy row of tenders says clean and fast. Neither is wrong — but they photograph differently and suit different menus.
You're racing the clock. Hot chicken cools in minutes. As it cools, the skin tightens and dulls, the sheen fades, steam disappears, and the whole thing slumps. Every technique below is built to win that race.
The 5 Chicken Shots Every Menu Needs
Build out these five chicken photos for your top sellers and you've covered roughly 95% of everything you'll ever need — menu boards, delivery-app thumbnails, the Instagram grid, your website hero, and press shots.
1. The Whole-Roast Hero
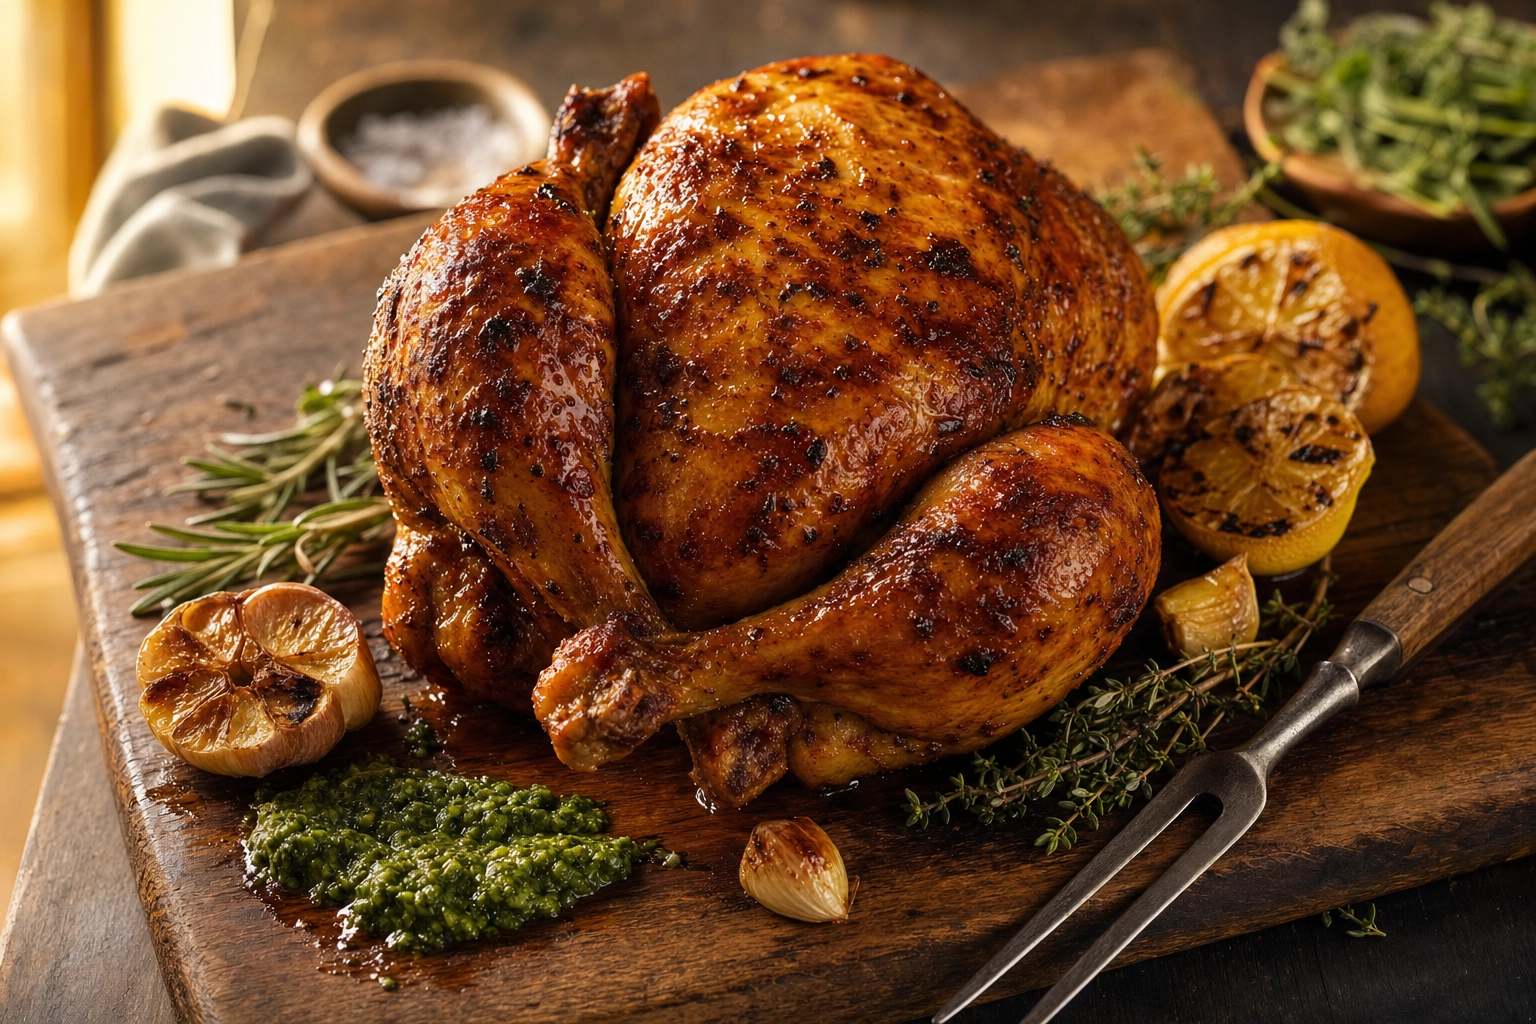 Whole roasted chicken with glistening mahogany skin on a wooden board with herbs and charred lemon — rotisserie roast hero
The crave shot for rotisserie and roast concepts. A whole bird — or a half — with glistening, mahogany skin, shot from a low three-quarter angle so you see both the burnished top and the steam-curling silhouette. This is rotisserie photography at its most primal: golden, dripping, generous.
Brush the skin with a little pan jus or neutral oil right before you shoot so it gleams. Stage it like it just came off the spit — a wooden board, a carving fork, a few sprigs of rosemary or thyme, a couple of charred lemon halves, maybe a swipe of bright green herb sauce for color. Carve one piece to reveal the juicy interior and you've answered the only question that matters: is it dry?
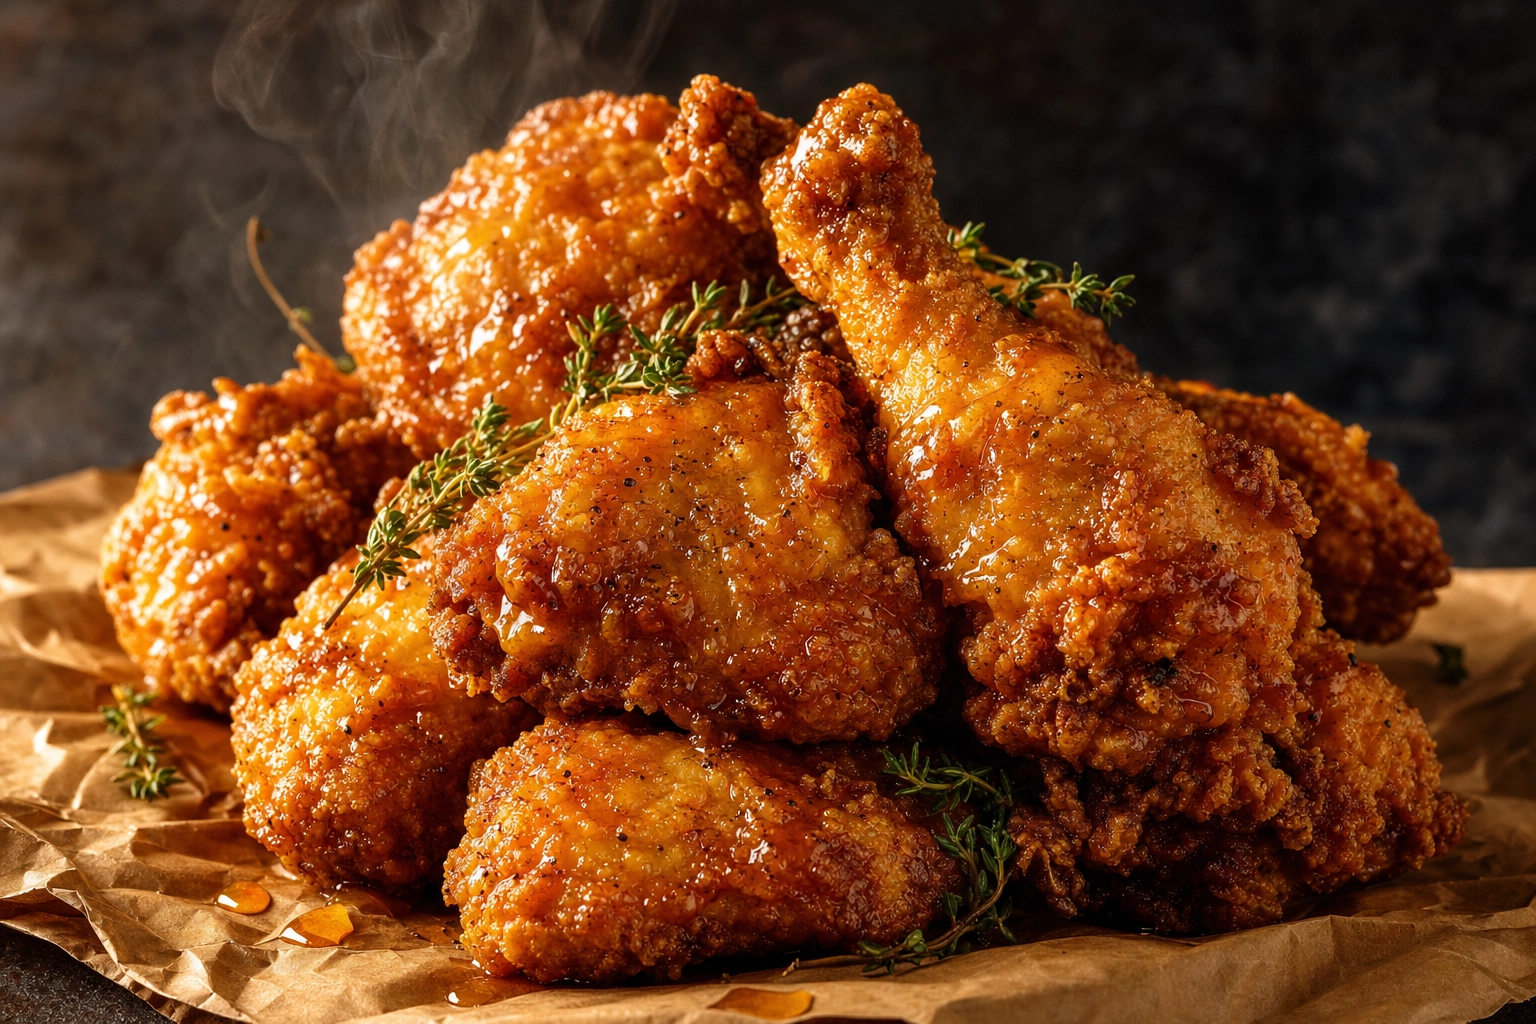
2. The Stacked Fried-Chicken Pile
The headline shot for any fried chicken photography. Pile pieces high for abundance — a lonely drumstick looks like a sample; an overflowing heap looks like a feast. Rotate each piece so its craggiest, most textured face turns toward the camera and the light.
Shoot it on a wire rack, crumpled parchment, or a metal tray for that just-out-of-the-fryer feel. Keep the light low and to the side (we'll get to why in a second) so every nook in the crust throws a tiny shadow. That shadow play is what makes the crunch readable on screen.
3. The Wings Platter
 Overhead platter of glossy BBQ and matte lemon-pepper chicken wings with blue cheese, celery and lime on a slate board
The sharing shot. Wings rarely travel alone, so photograph them as a spread — a packed platter shot from directly overhead (flat-lay) for that "look at this haul" effect, or a tight three-quarter angle when you want to show off glossy sauce sheen. This is the bread-and-butter of wings photography for sports-bar, delivery, and catering proposals.
Fight the brown with color. A garnish of celery and carrot sticks, a ramekin of blue cheese or ranch, a scatter of sesame and sliced scallion, and a wedge of lime give the eye somewhere to rest and instantly read as "fresh." This is complementary colors in action — orange wings pop hardest against cool blues, which is exactly why blue cheese and a slate-blue board flatter a tray of buffalo wings.
4. The Sandwich Cross-Section
 Crispy fried chicken sandwich cut in half showing a thick craggy cutlet, pickles and slaw cross-section on white marble
The highest-converting chicken-sandwich shot, full stop. Take a long, very sharp knife and cut the sandwich clean in half, then ease the halves apart so the camera sees the whole architecture: a thick, craggy cutlet overhanging the bun, melting cheese, pickles, slaw, and sauce. Shoot at eye level so the stack reads top to bottom.
A fried cutlet that bulges past the edges of the bun looks ten times more craveable than one tucked neatly inside. Toast and butter the bun so it glazes, let a pickle peek out, and re-add a fresh dab of sauce in the cut face — a knife drags sauce away and leaves the inside looking dry. For more on building these, our sandwich photography playbook goes deep on cross-sections and stacks.
5. The Hands-On Drumstick
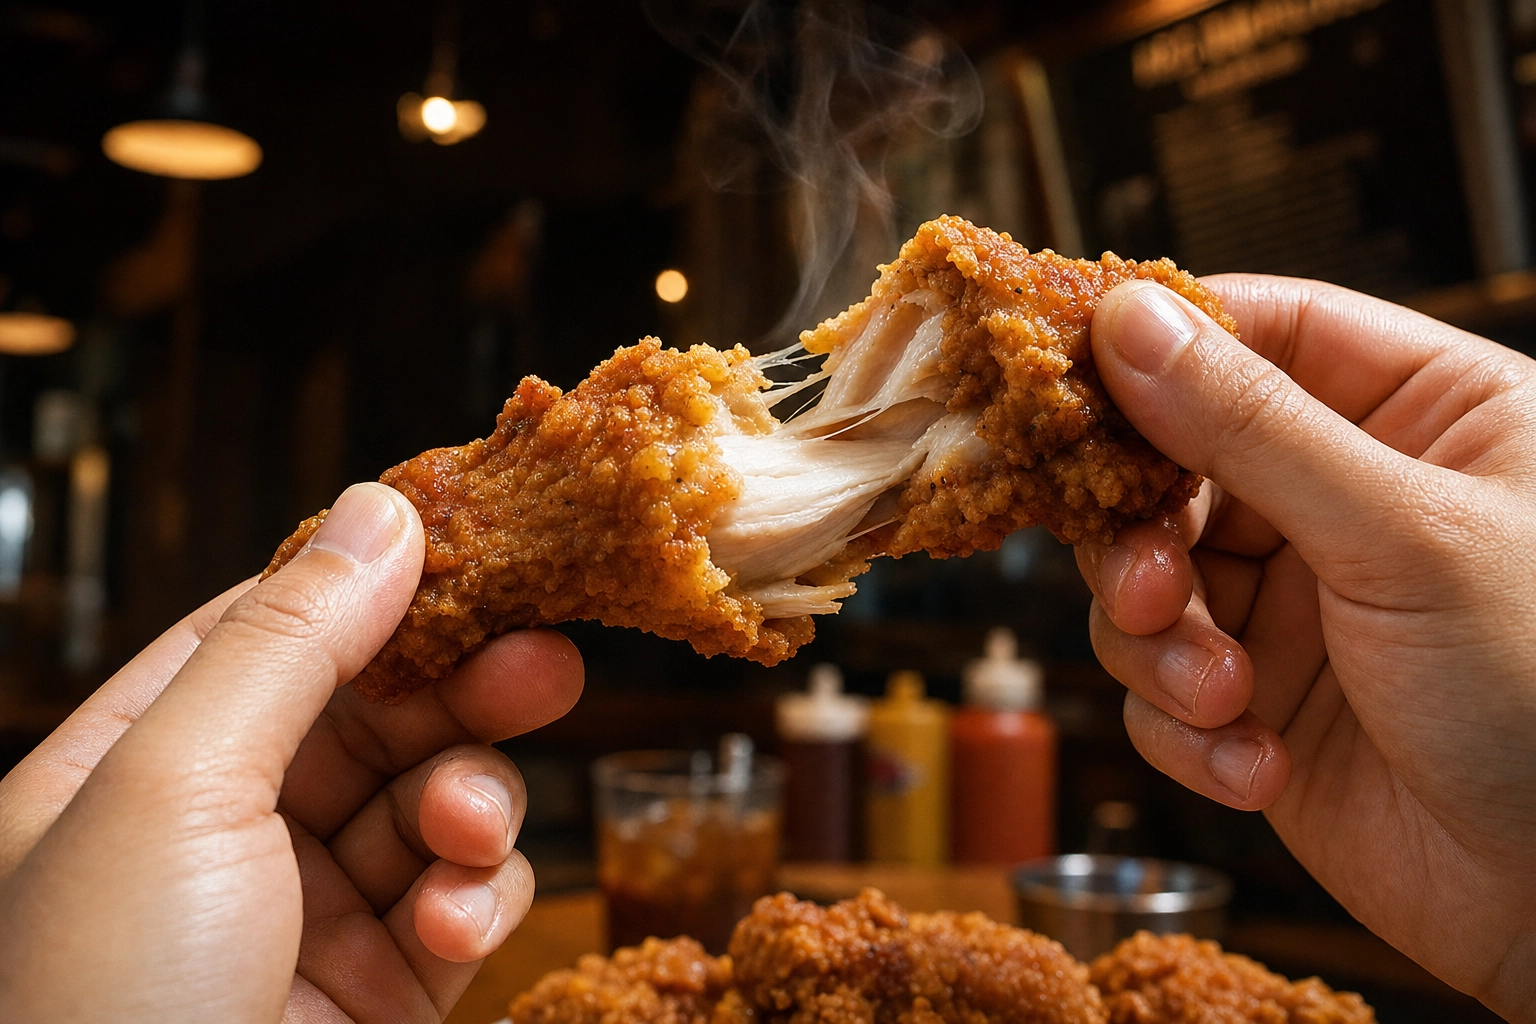 Two hands tearing into a crispy golden fried chicken drumstick with steam and juicy meat at the break — eating action shot
The shot that sells the experience instead of the product. Two hands — or one — tearing into a drumstick, dipping a tender, or lifting a sandwich mid-bite. Action beats a static plate every time because it puts the viewer in the moment.
Aim for a little drama: a sauce drip about to fall, a wisp of steam, a piece of crust mid-shatter. Keep hands clean and dry, no rings or loud nail polish, and fire off a burst of 8–10 frames to catch the one perfect split second. These hands-on shots crush it on social and in delivery lifestyle imagery, which is why food content creators lean on them so heavily — they feel real.
Lighting Crispy Skin: Raking Light & Warm Tones
Lighting is the single biggest factor in whether your chicken looks shatter-crisp or sad and soft. Most bad chicken photos are really just badly lit chicken photos. Here's how to fix that.
Position the Light to Rake the Crust
 Hand brushing oil onto crispy fried chicken on a wire rack with raking side light and white reflector to reveal texture
The golden rule for crispy skin: light it from the side or slightly above, never head-on. When light skims across the surface at a low angle — what photographers call raking light — every craggy ridge of crust casts a tiny shadow. Those micro-shadows are texture. They're the difference between a crust you can almost hear and a smooth beige blob.
A few practical moves:
- Put a window or your key light to the side, roughly 45–90° off the chicken, so the crust lights up in relief.
- Bounce a white card or sheet of foam board into the shadow side. Dark meat especially wants this fill light, or it sinks into black and loses all detail.
- Kill the on-camera flash. A built-in flash blasts the food straight on, flattens all that hard-won texture, blows the glossy bits into hot white spots, and greys out the rich golden tones. Soft window light beats it every time.
- Lift a piece on scrunched foil hidden behind it to tilt its best face toward the camera and add depth to a flat plate.
Warm Tones, Golden Brown & the All-Important Sheen
That gorgeous golden-brown color has a name: the Maillard reaction, the browning of proteins and sugars that kicks in around 280–330°F and gives crust both its flavor and its color. Your job is to make that color glow, not go dull.
Natural light is your best friend here. Shoot in warm light — golden hour near a window, or nudge your white balance slightly warm — so the crust reads rich and appetizing. Don't overcook it into neon orange; aim for honeyed, not radioactive.
And never forget the sheen. A matte, dry-looking piece of chicken looks old; a piece with a soft highlight looks fresh and juicy. Right before shooting, brush the skin with a whisper of neutral oil or melted butter to bring back the gleam — then dab off any excess with a paper towel. The line between "crispy" and "greasy" is exactly that: a brushed sheen reads crispy, a puddle reads greasy.
Saucing & Glazing: BBQ, Buffalo, Teriyaki, Honey & Lemon-Pepper
Sauce is where wings and glazed chicken are won or lost, and the mechanics matter as much as the recipe.
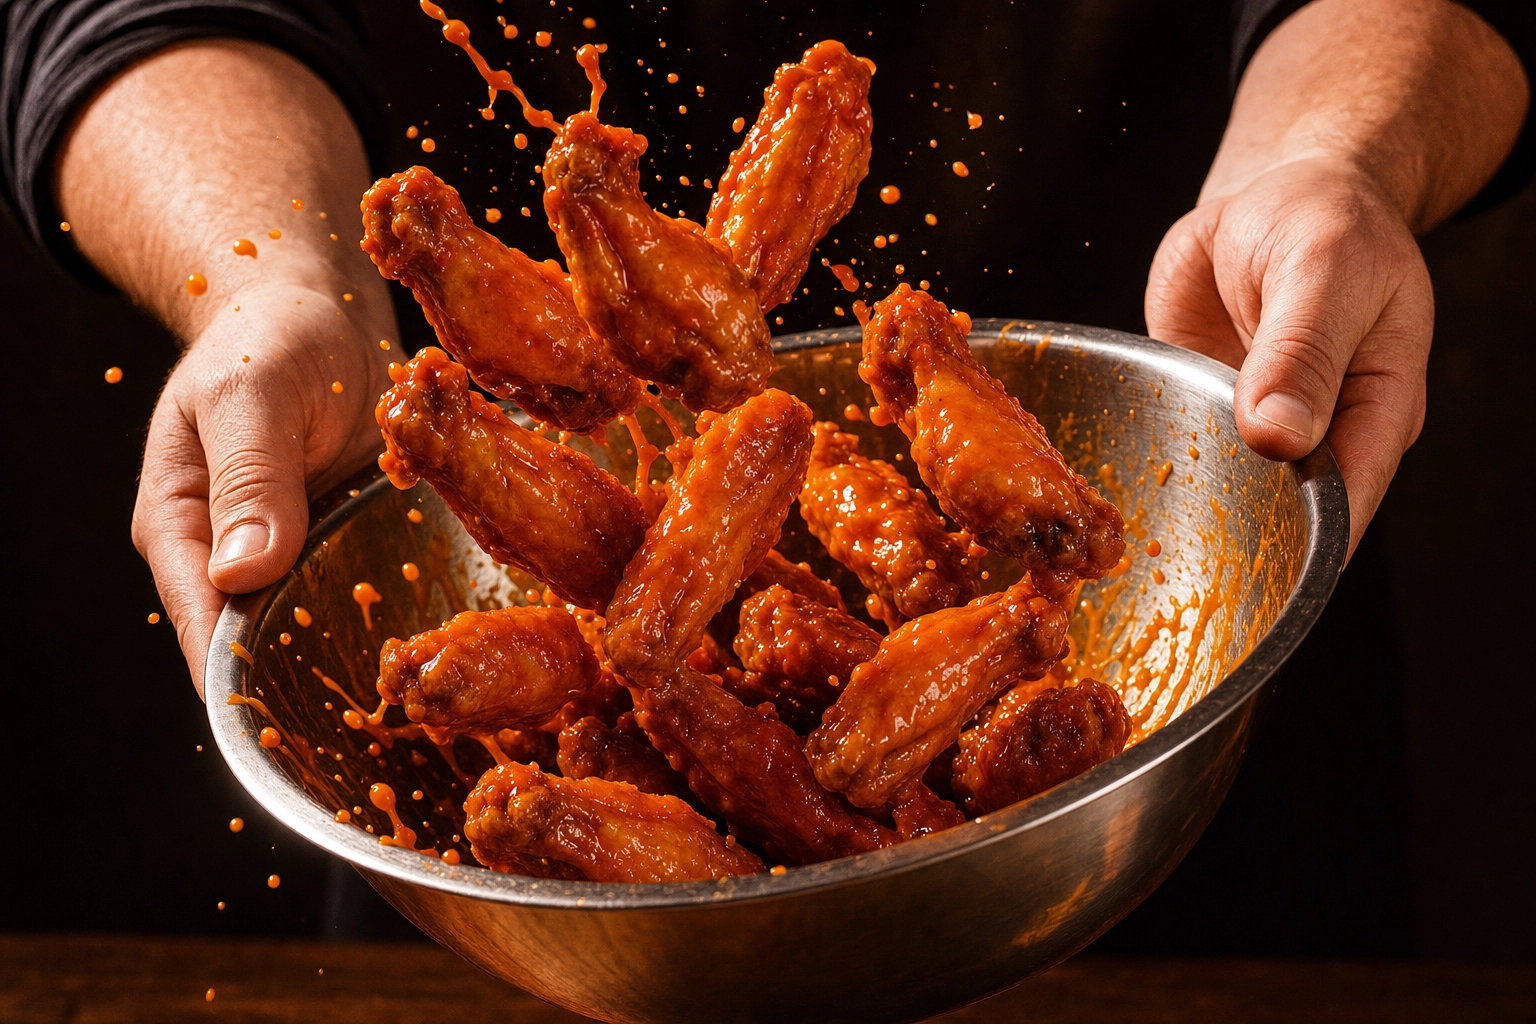 Chicken wings tossed mid-air in a steel bowl coated in glossy buffalo sauce with flying droplets — saucing action shot
Glossy Sauces: BBQ, Buffalo, Teriyaki & Honey
For an even, craveable coat, toss the chicken in a steel bowl with the sauce just before shooting — it covers far more evenly than spooning sauce on top. For touch-ups, switch to a squeeze bottle or a small brush so you control exactly where it lands, and always dress the side facing the camera.
- BBQ wants a lacquered, glossy look — brush on thin layers, let a single drip run down for motion, and catch a highlight on the sticky surface.
- Buffalo should be bright orange and glistening, with a little sauce pooling under the wings and a cool, chunky blue cheese alongside for contrast.
- Teriyaki reads as a dark, sticky, high-gloss glaze — finish with sesame seeds and sliced scallion so the shine has something to frame it.
- Honey (and hot-honey) is all about the drizzle: pour a slow amber ribbon right before the shutter so it catches the light mid-pour.
One pro habit: after any cut or bite, re-add a fresh dab of sauce to the exposed area. Knives and teeth drag sauce away and leave the inside looking parched.
Dry & Semi-Dry: Lemon-Pepper & Nashville Hot
Not every coating is glossy, and faking gloss where it doesn't belong looks wrong. Lemon-pepper is a dry rub — lean into it. Show the coarse black pepper and flecks of yellow zest clinging to the skin, keep the texture matte and powdery, and let the bright zest add the color. A very light butter sheen is fine; a wet, saucy look is not.
Nashville hot is the opposite drama. That fiery red-orange cayenne oil should glisten on the crust, and the classic staging — slices of plain white bread underneath, dill pickle chips on top — gives you the color contrast and the visual heat the dish is famous for.
Style-by-Style Chicken Photography
Every chicken style has its own visual playbook — and these poultry photography principles carry over to turkey and duck, too. The dish always stays the hero; your props, background, and composition are just there to support it. Here's how to shoot the big ones.
Fried Chicken & the Overflowing Bucket
Fried chicken is about abundance and texture. Pile it high and let pieces spill — an overflowing bucket or basket reads as generous and indulgent. Keep the light warm and raking to maximize crunch, and use a red-and-white bucket or checkered paper as context (skip faking any real brand's logo). Mix pieces — a craggy thigh, a knobbly drumstick, a wing — so the texture varies across the frame.
Rotisserie & Whole Roast
Rotisserie is glisten and drip. The skin should look lacquered and mahogany, with juices beading on the surface. Show rows of birds on the spit for context, then carve to reveal the steaming, juicy interior — the contrast between burnished skin and pale, moist meat is the whole sell. Herbs, lemon, and a vivid green sauce (think Peruvian ají verde) cut through the brown beautifully.
Grilled, BBQ & Global Heat (Korean, Nashville, Tikka)
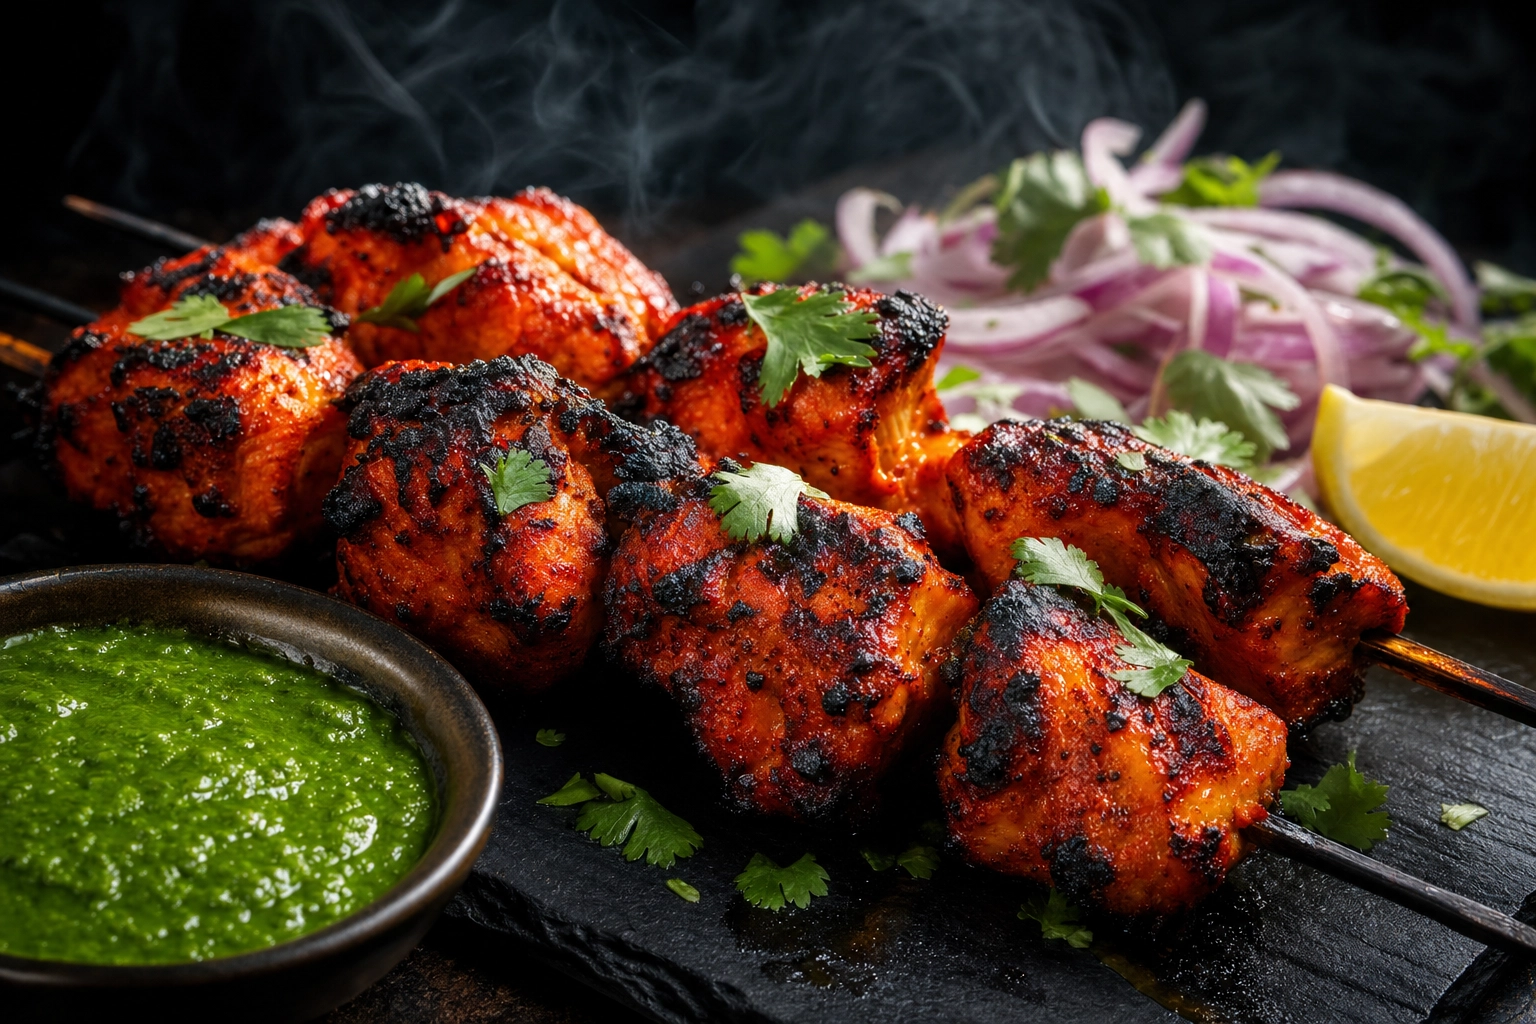 Charred tandoori chicken tikka skewers with vibrant red-orange marinade, cilantro, red onion and mint chutney on slate
Grilled chicken lives and dies by its marks. Press pieces flat against the grate (a weighted pan helps) for clean crosshatch grill marks, and use raking light so the char ridges pop — the same technique we cover in our BBQ & grilling photography guide. Lime wedges, fresh herbs, and a little char keep it from going flat (it's the same principle behind great steak photography).
The global crispy stars each have a signature look. Korean fried chicken is double-fried for a shatter-crisp shell, then lacquered in glossy gochujang or soy-garlic glaze and showered with sesame and scallion — shoot for the gloss. Tandoori and tikka bring charred edges and a vibrant red-orange marinade; lean on the char spots, a squeeze of lemon, and a scatter of cilantro, and resist the urge to oversaturate the red into something cartoonish.
Bone-In vs Boneless: Which Reads Better?
This is a real chicken photography styling decision, not a coin flip, because the two photograph with totally different personalities.
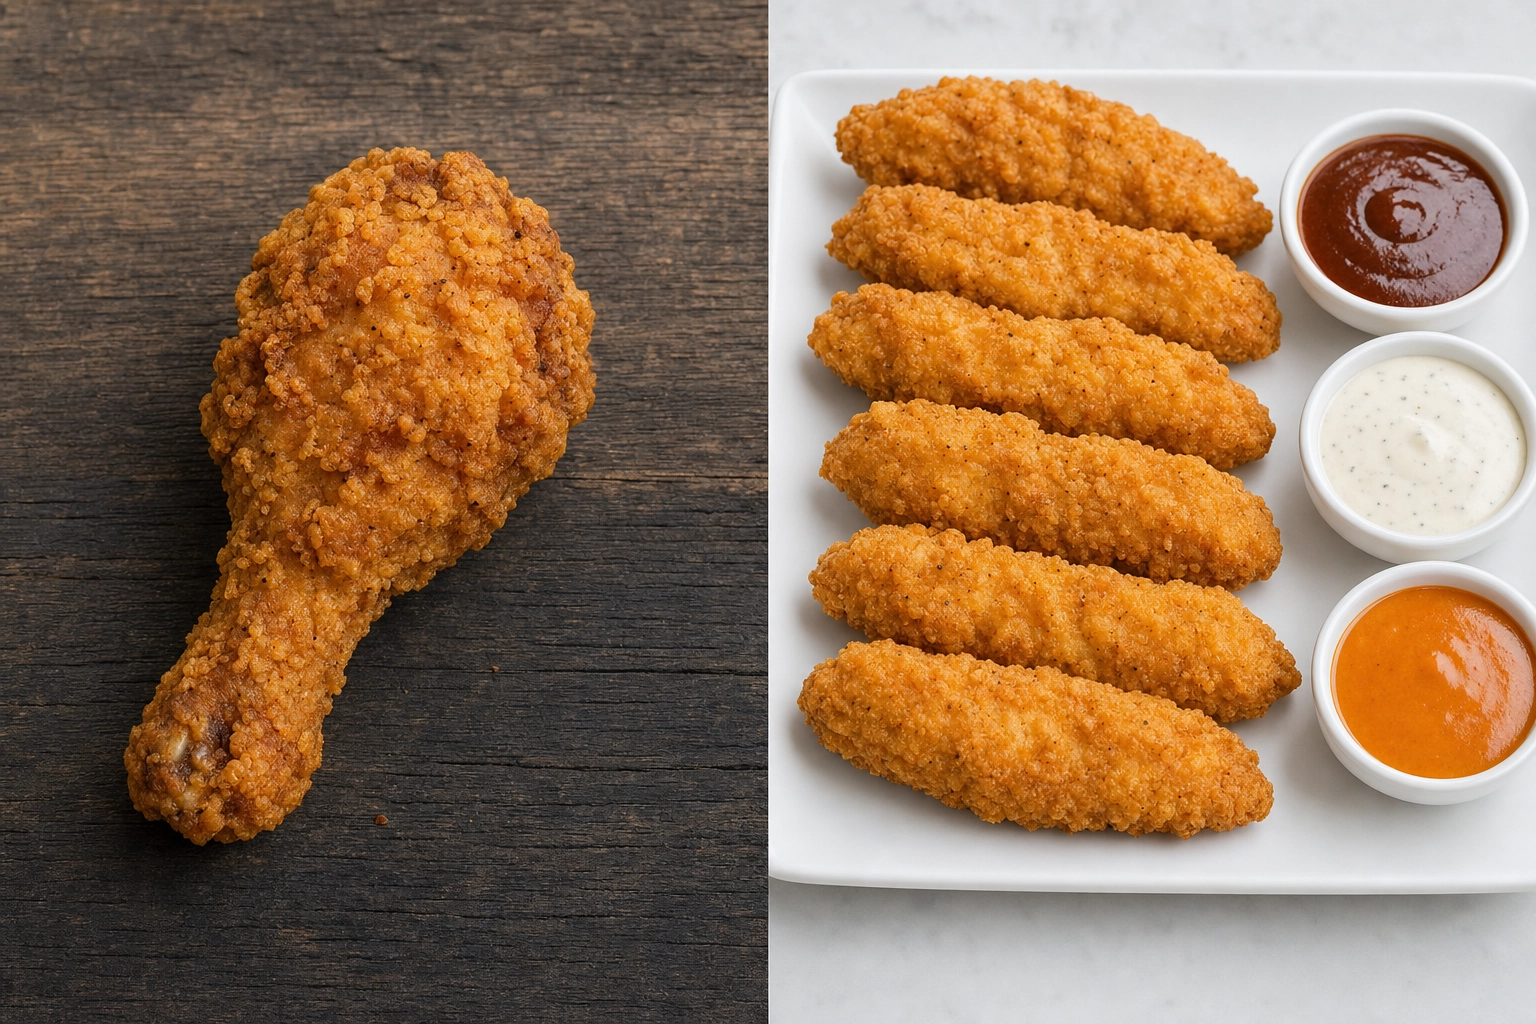 Bone-in fried chicken drumstick beside a neat row of boneless golden tenders with dipping sauces — menu presentation comparison
Bone-in — drumsticks, wings, thighs, a half bird, a loaded bucket — reads rustic, authentic, and craveable. Bones give you dramatic silhouettes and an obvious handle, which makes bone-in the natural choice for hands-on action shots and anything that wants to feel like real, homestyle food. The trade-off: pieces are irregular and harder to stack into tidy compositions.
Boneless — tenders, cutlets, nuggets, popcorn chicken — reads clean, uniform, and fast. It lines up beautifully in rows and trays, plays perfectly with dipping sauces, and gives you that gorgeous sandwich cross-section. The risk is looking processed or flat, so fight back: emphasize craggy, hand-breaded texture, add color on the sides, and stage generous dipping sauces so the plate feels alive.
A simple menu rule: lead with bone-in for crave-driven, authentic concepts, and boneless for fast-casual, dipping, and sandwich menus — especially delivery-app tiles, where a clean, uniform tender box thumbnails better at postage-stamp size. Plenty of chicken brands shoot both and use each where it performs best.
It's worth remembering the food underneath all this styling is real food: the USDA recommends cooking all chicken to a safe minimum internal temperature of 165°F. Stylists may pull a piece a touch early for extra juiciness on set, but anything you actually serve should hit temp — you can still stage the moisture cues (a brushed sheen, a juicy carved face, a wisp of steam) on properly cooked chicken.
The 90-Second AI Chicken Photography Workflow
Here's the reality for most chicken shops: there's no time to stop the Friday rush for a styled shoot, and hiring a pro runs $300–$1,200 a session. So the modern workflow skips the studio entirely. You shoot a decent phone photo and let AI do the heavy lifting.
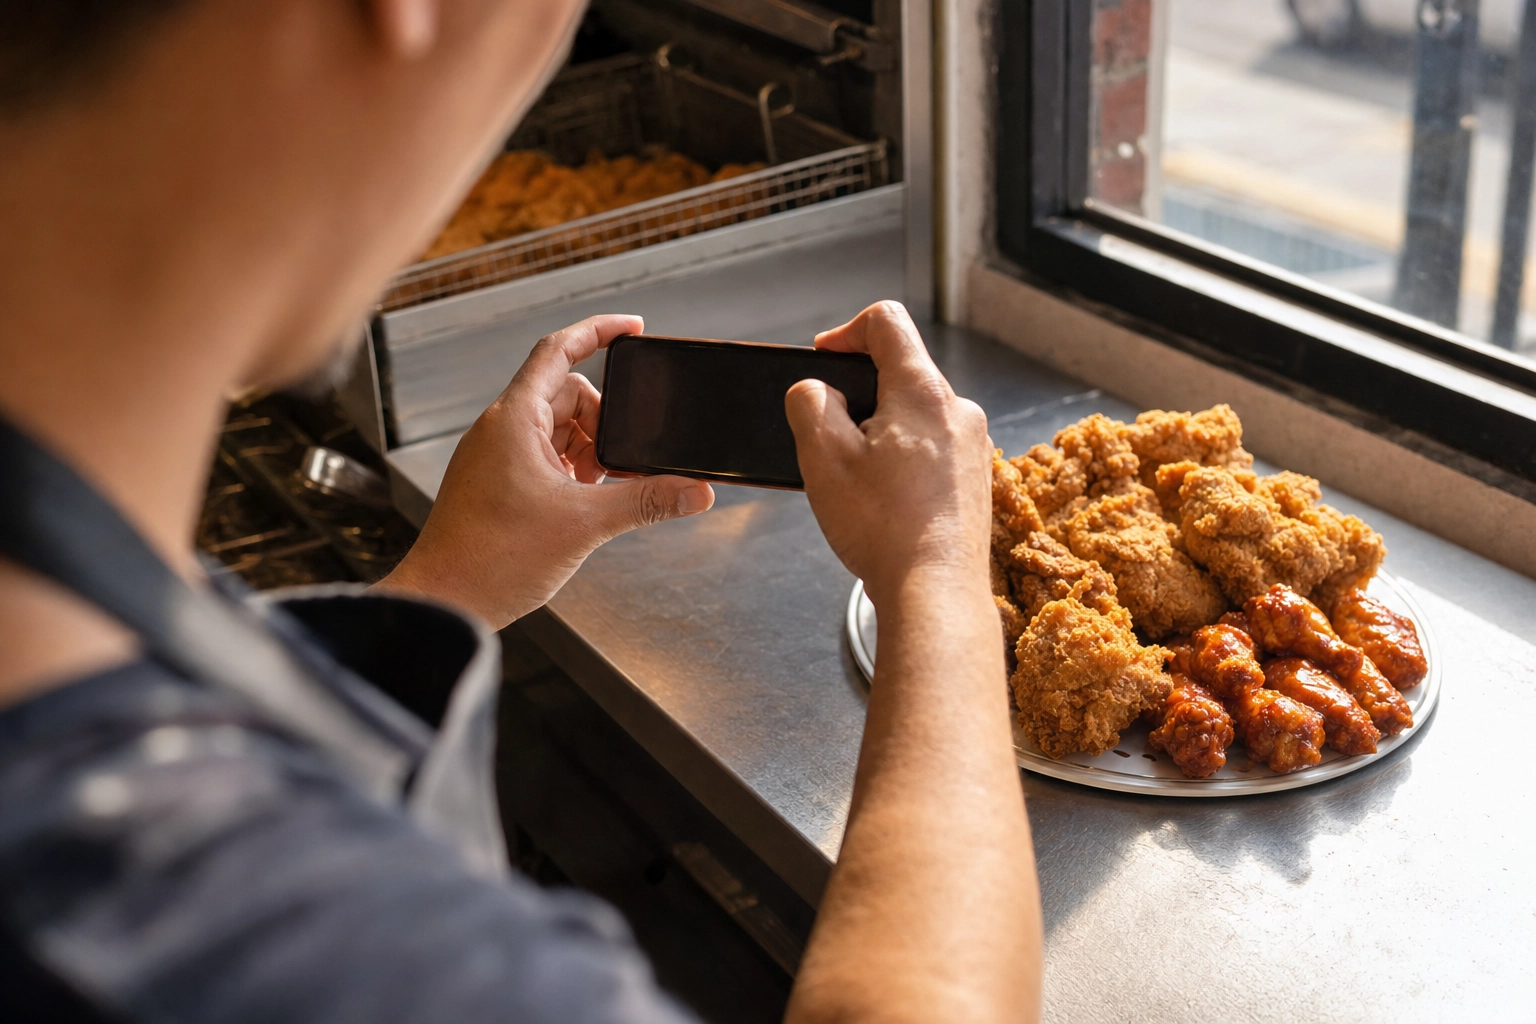 Chicken-shop owner using a phone to photograph a plate of golden fried chicken and wings by a sunlit counter
Step 1 — Take a clean phone snap. Find soft, natural light (a window or open shade), tap to focus on the chicken, and drag the exposure down a hair so the crust doesn't blow out. Get close, fill the frame, and grab a couple of angles. You're not trying to nail the final image — just give the AI good raw material.
Step 2 — Upload to FoodShot. Drop the photo into the AI food photo editor and pick a chicken-appropriate style — fried, rotisserie, wings, Korean, Nashville, grilled, or sandwich. Or use Builder Mode to combine a background, plate, and your food into a custom scene.
Step 3 — Refine with a prompt. Type what you want changed in plain English: crisp up the crust, add a glossy buffalo coat, warm the tones, brighten the background. Want every dish on your menu to share one signature look? Upload a reference with My Styles and the tool keeps your whole menu visually consistent.
Step 4 — Generate, pick, and export. You get multiple variations in about 90 seconds. Choose your favorite, export in 4K, and you're done — with a commercial license on every paid plan. On the Scale plan you can batch up to five photos at once, which is how a wings joint re-shoots an entire menu in an afternoon.
The output is ready wherever you need it: delivery-app tiles, menu boards, social posts, even printable promo posters through Poster Mode. It's the same approach we walk through in our AI food photography overview, applied to crispy, saucy, golden chicken — and it's built for chicken brands and menus exactly like yours.
You can try it free — the Free plan includes 3 credits (watermarked, for personal use), and paid plans start at $9/month billed yearly. See full plans on the pricing page. However you shoot, the goal is the same: chicken so crispy, juicy, and golden that people order it before they've read a single word. No secret recipe, no studio — your chicken shop can be photo-ready in 90 seconds.
Frequently Asked Questions
How do I make fried chicken look crispy and not greasy in photos?
Light it from the side or slightly above so raking light catches every craggy ridge of the crust — head-on flash flattens it. Brush on a thin sheen of neutral oil, then dab off the excess; a brushed highlight reads crispy, while a puddle reads greasy. Keep the tone warm and golden, shoot fast before the skin dulls, and get close so the texture fills the frame.
How do I photograph white meat chicken without it looking dry?
White meat (breast) is lean and goes chalky fast, so stack the deck in your favor. Favor dark meat for hero shots, or show white meat as a freshly carved cross-section with visible juices. Brush the cut face with a little jus or oil for sheen, add a wisp of steam (a microwaved damp cotton ball hidden behind the plate works), and avoid harsh overhead light that bleaches it out. Serve it cooked to a safe 165°F, but style the moisture cues so it reads juicy.
What's the best way to photograph wing sauces?
Toss the wings in a bowl for an even coat, then shoot with side or side-back light so the glossy, sticky surface catches a highlight. Add a fresh dab of sauce right before the shutter, let a little pool under the wings for richness, and use color contrast — blue cheese, celery, sesame, scallion — so the sauce reads vivid instead of muddy. Match the finish to the sauce: glossy for buffalo and BBQ, matte and flecked for lemon-pepper.
Should I shoot bone-in or boneless chicken for my menu?
Use bone-in (drumsticks, wings, thighs) for crave-driven, authentic, hands-on shots, and boneless (tenders, cutlets, nuggets) for clean, uniform compositions, dipping trays, and sandwich cross-sections. Match the choice to your concept and platform — boneless tends to thumbnail better on delivery apps, while bone-in feels more indulgent on a hero image. Plenty of chicken brands shoot both.
Can I get menu-quality chicken photos with just a phone?
Yes. A modern phone plus soft, directional light and tight framing gets you most of the way, and an AI food photo editor closes the gap — turning a clean phone snap into a studio-quality, menu-ready chicken photo in about 90 seconds, no studio or pro gear required. Peer-reviewed research shows appealing food photos measurably raise customers' likelihood to order, so it's worth getting right.
Related Posts
- Burger Photography: Stacking, Styling & Shots That Sell — the architecture tricks behind a perfect stack.
- BBQ & Grilling Photography: Smoke, Sear & Char Like a Pitmaster — char, smoke, and grill marks for grilled chicken and beyond.
- Food Styling for Photography — the broader toolkit of pro styling tricks that work on any dish.