BBQ & Grilling Photography: Smoke, Sear & Char Like a Pitmaster
Smoke curling off a brisket. A flare-up licking the edge of a ribeye. Mahogany bark crackling under a knife. Grilling photography captures the most primal, mouthwatering subject in all of food — and, frustratingly, barbecue is also the hardest thing to shoot well. Done right, one grilling photo can make a stranger crave your cooking from across the internet. Done wrong, hours of smoke and fire end up looking like a sad brown lump.
Here's the cruel irony: the very qualities that make grilled food taste incredible make it tough to photograph. The meat is dark and brown-on-brown. The smoke that smells amazing shows up as a faint gray haze. The sear that took hours to build dries out in five minutes. Point your phone at a tray of barbecue and you'll often get something flat, muddy, and lifeless — nothing like what's actually in front of you.
This guide is a complete, practical playbook for grilling photography that actually works. Whether you run a smokehouse, a BBQ truck, or a backyard cook account with 50k followers, you'll learn how to capture char, smoke, sear, and gloss like a pitmaster — using gear you already own. And when you're slammed during a Friday dinner rush and can't pause for a proper shoot, I'll show you how to turn a quick phone snap into menu-ready food photography in about 90 seconds.
Quick Summary: Great grilling photography comes down to four things: shoot in soft natural light (golden hour or open shade), get in close on char and grill marks, capture smoke by backlighting it against a dark background, and add color to break up the brown. No pro camera required — a modern phone plus good light and light editing does the job. When the cook can't wait, FoodShot AI's BBQ style turns a real phone photo into a studio-quality barbecue shot in about 90 seconds.
Why Grilling Photography Hits Different
Most food photography is about delicacy — the perfect macaron, the swirl of foam on a latte. Grilling photography is the opposite. It's loud. It's fire, fat, smoke, and char, shot outdoors over live flame. The appeal is primal: we're hardwired to crave the smell of searing meat, and a great grilling photo taps straight into that instinct.
The visual language of barbecue is unmistakable:
- Char marks — the dark crosshatch that says "kissed by real fire."
- Smoke — the proof of low-and-slow patience, rising in lazy ribbons.
- Sear and bark — that crusty, caramelized exterior you can almost feel through the screen.
- The outdoor cooking lifestyle — wood, embers, butcher paper, cast iron, and hands at work.
When you nail it, the payoff is huge. On a menu or a delivery app, an appetizing photo is the difference between a customer scrolling past and a customer ordering. For barbecue joints, BBQ food trucks, and grilling content creators, the photo is the first bite — it has to deliver the sizzle before anyone tastes a thing. That's the whole promise of great barbecue photography: it sells the flavor before the fork.
But let's be honest about the challenge, because it's the whole reason this guide exists: barbecue is brown. Brisket, ribs, pulled pork, burnt ends — gorgeous in person, but to a camera it's a monochrome pile of dark tones that reads as muddy and flat. Add fleeting smoke and a sear that fades fast, and you've got the trickiest subject in food photography. Everything below is built to solve exactly that.
The 5 Essential Grilling Shots Every Pitmaster Needs
If you master only five shots, master these. Together they cover any cook, any menu, and every platform — from a DoorDash thumbnail to an Instagram reel cover.
1. The Meat-on-the-Grill Action Shot
This is the hero of grilling photography: meat over open fire, with something happening. A steak sitting still on the grate looks fine — but a steak with fat dripping into a quick flare-up looks great. Static meat reads as "cooked hours ago." Live flame, rising smoke, or a sizzling edge reads as alive.
How to get it:
- Wait for the moment. Flames lick and smoke billows in bursts, not constantly. Keep shooting and you'll catch the frame where everything's dancing.
- Use a fast shutter (1/125s or quicker on a camera; just tap to focus on a phone) to freeze the flame instead of blurring it.
- Mind your framing. Use the rule of thirds — place the meat on one of the grid lines instead of dead center for a more dynamic shot.
- Include the fire. Get the grate, coals, or wood partially in frame to establish the live-fire setting.
- Shoot a burst. Pros fire off 30+ frames to land one perfect flare. Digital shots are free — don't stop at one.
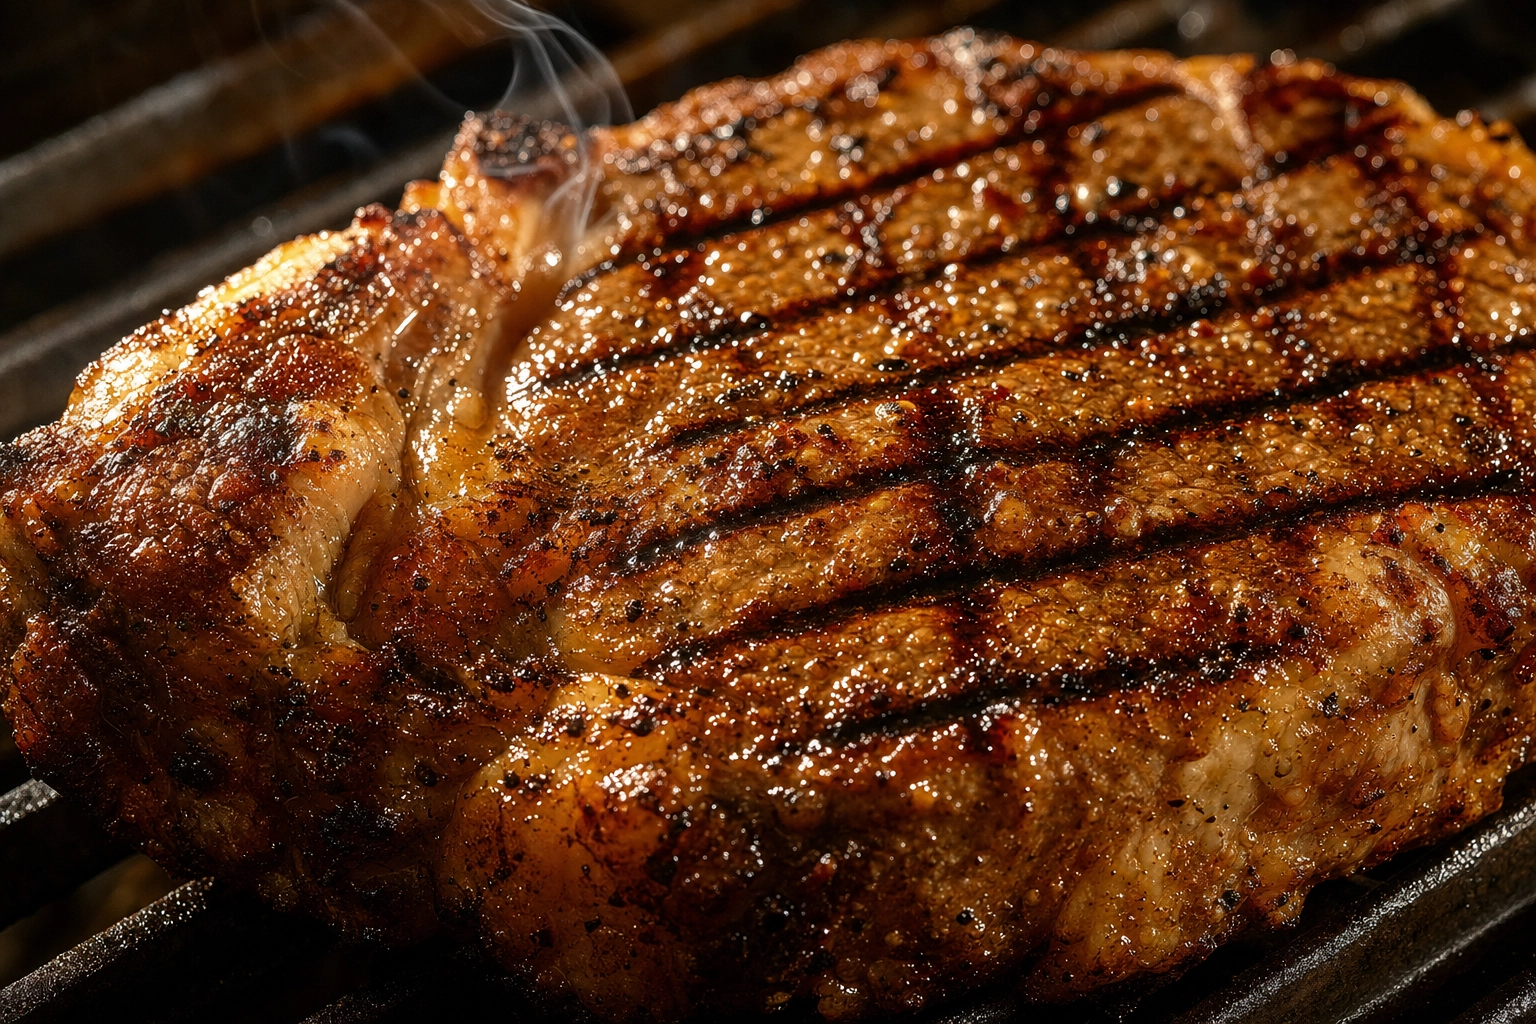
2. The Grill-Mark Close-Up
Grill marks are the signature of the grill. That crosshatch char is shorthand for flavor, so get in tight and let it fill the frame. Approach it like a wildlife photographer stalking detail — close, low, and patient.
 Macro close-up of crosshatch grill marks and char crust on a seared steak in grilling photography
- For clean crosshatch marks, rotate the food 90 degrees halfway through each side.
- For uneven items (a spatchcocked chicken, a knobbly sausage), press them flat with a weighted sheet pan so the whole surface touches the grate — a classic food styling trick for even grill marks.
- Use side or raking light so the ridges cast tiny shadows — that's what makes the texture pop instead of looking painted on.
- Focus on the crust, not the plate. The sharper the char, the more it sizzles.
This works for everything from steak (see our steak photography guide) to grilled chicken and burgers.
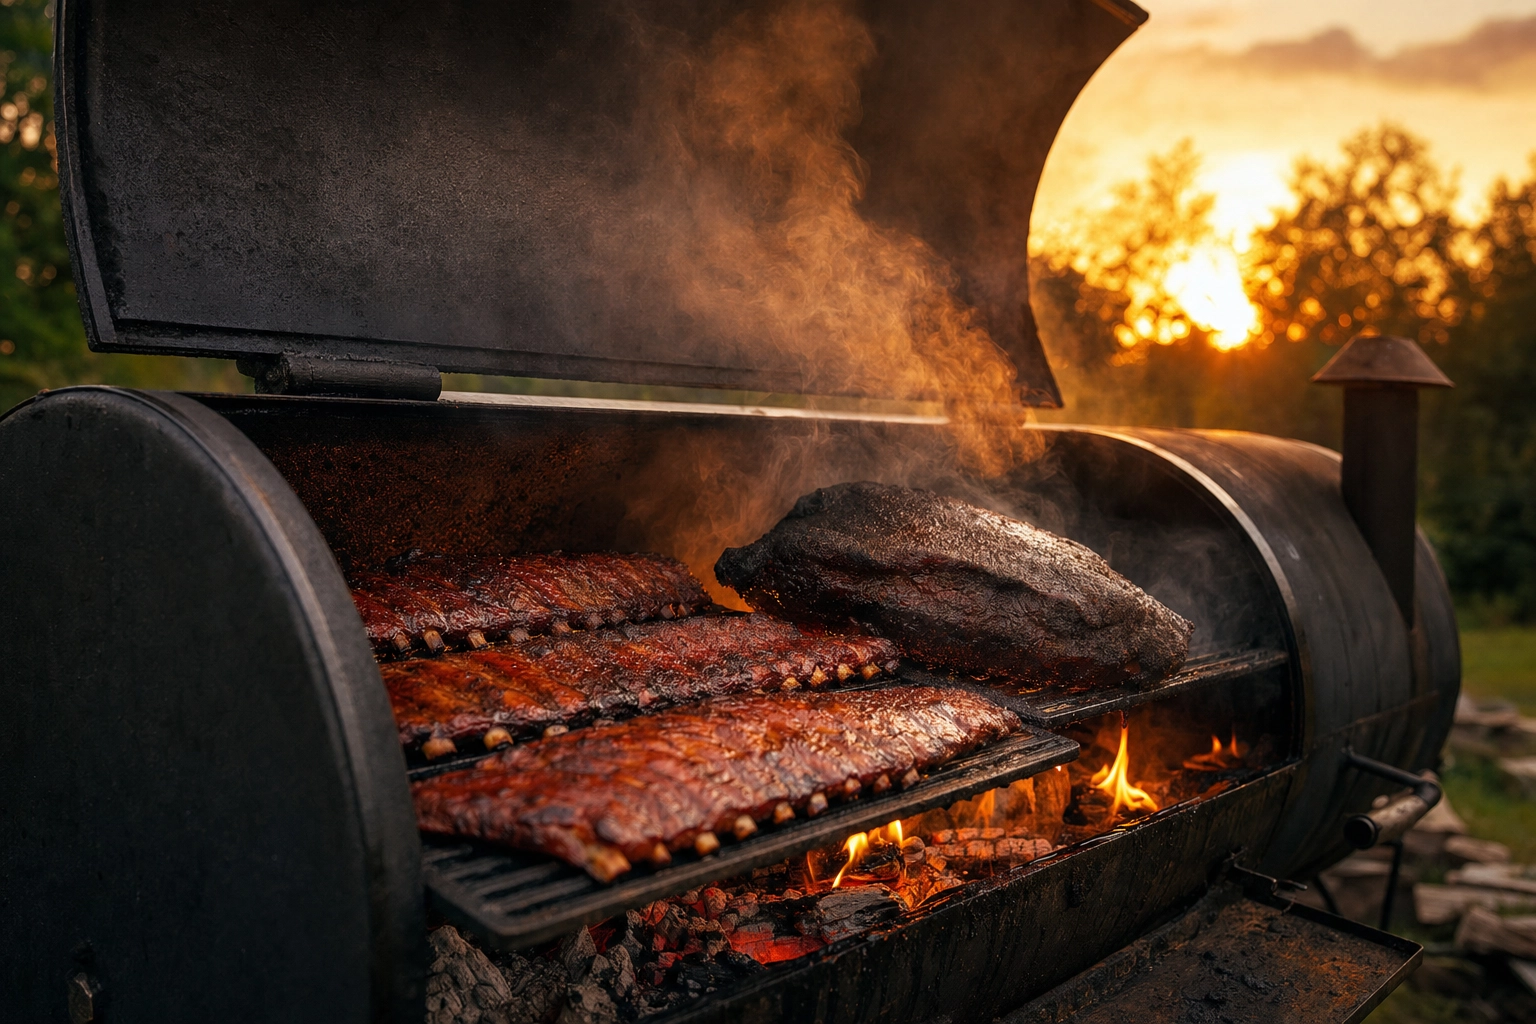
3. The Brisket Slice: Bark & Smoke Ring
The single most powerful BBQ image is a fresh cross-grain slice showing three things at once: dark, peppery bark on the outside, a rosy smoke ring just beneath it, and glistening, marbled meat in the middle.
- Slice and shoot immediately. Barbecue dries out fast under any light — every minute the slice loses sheen and the bark dulls.
- Cut against the grain and fan the slices slightly so the camera sees the ring on each one.
- A whisper of neutral oil brushed on the cut face brings back the glisten. Go light — too much looks greasy. Dab off any excess with a paper towel.
- Shoot at eye level or a low three-quarter angle to show the height and the layered cross-section.
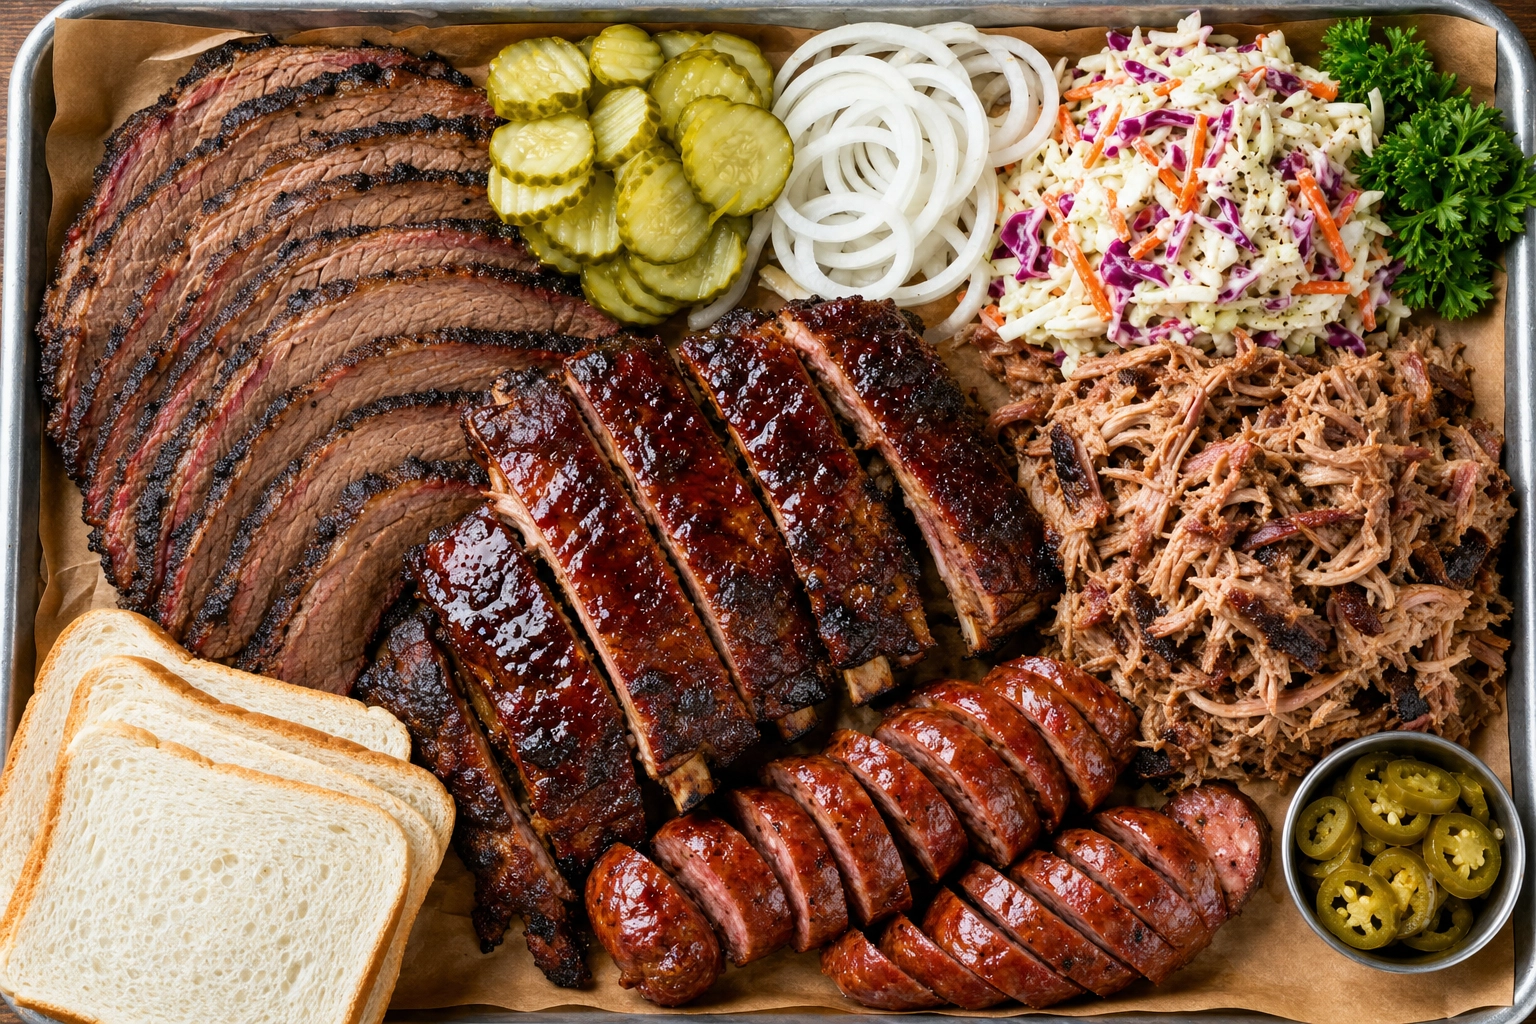
4. The BBQ Platter Spread
Nothing sells abundance like the full tray shot — brisket, ribs, sausage, and sides crowded onto butcher paper, photographed from directly overhead.
- Go flat-lay (straight down) for spreads. It shows every item and creates that "look at this feast" effect.
- Fight the brown. This is where color rescues you: pickles, raw onion, white bread, bright slaw, a sprig of parsley, pink butcher paper. Those accents give the eye somewhere to land.
- Fill the frame. A packed tray feels generous; a sparse one feels stingy.
Platter shots are gold for menus, combo deals, and a BBQ catering proposal, where the spread does a lot of the selling.
5. The Pitmaster Hands-On Shot
People trust people. A shot of hands pulling pork, slicing brisket, mopping on sauce, or working tongs over the pit adds story, scale, and instant authenticity.
- Frame the hands in motion — mid-pull, mid-slice, mid-mop. Action beats a posed grip.
- Keep focus on the food and let the hands and tools frame it.
- These shots crush it on social because they feel real and behind-the-scenes — exactly the content grilling content creators build audiences on.
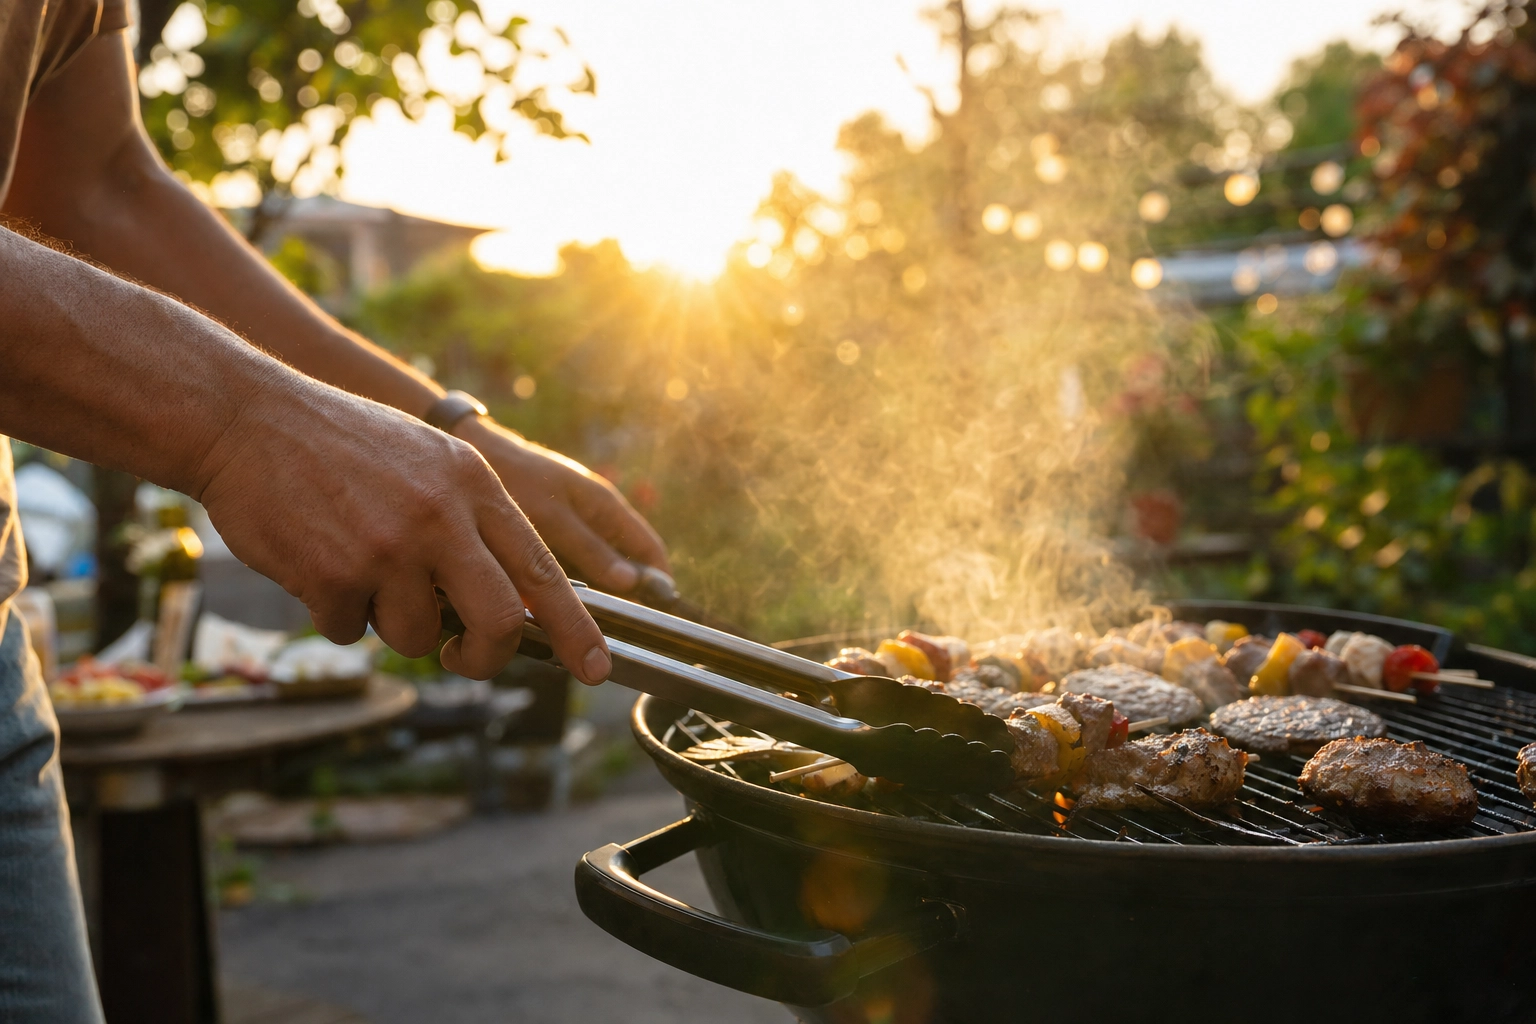
Lighting Grilled Food: Golden Hour, Reflectors & Flash
Light is the number-one factor in food photography, and it's where most BBQ shots go wrong. Here's the rule that fixes 80% of bad grilling photos: kill the flash.
A built-in camera or phone flash blasts the food head-on. It flattens all that beautiful crust texture, blows the glossy bits into white hot spots, and turns rich, mahogany grilled meat into a pale, greasy-looking lump. Natural light is almost always better.
 Hands flipping burgers and skewers on a kettle grill at golden hour with warm backlight, outdoor grilling photography
Outdoors, chase golden hour. The hour or so before sunset gives you warm, soft, directional light that makes caramelized crust glow and bark look three-dimensional. It's the single easiest upgrade to your BBQ photos — same food, same phone, dramatically better result.
Use the sun like a pro:
- Put the light to the side or behind the food (side-lit and back-lit beats front-lit) so texture and smoke catch the light.
- Bounce a reflector — even a sheet of white foam board or a paper plate — into the shadow side to keep the dark meat from going black.
- Overcast day? Great news. Clouds are a giant softbox, giving you even, flattering light with no harsh shadows. Avoid harsh noon sun, which creates ugly contrast and hard shadows.
Indoors or after dark, don't reach for the bare flash. Instead:
- Shoot near a big window with the food side-on to the light.
- If you must use artificial light, bounce it off a ceiling or wall, or diffuse it through a white sheet so it wraps softly around the food.
- A couple of daylight-balanced bulbs in cheap clamp lights beat a built-in flash every time.
Then dial in your camera or phone:
- On a phone, tap to focus on the food and drag the exposure slider down slightly so the bright crust and smoke don't blow out.
- Use Portrait mode to gently blur a busy background.
- Never use digital zoom — it just crops and degrades the image into grain. Move closer instead.
- On a DSLR or mirrorless, f/2.8–f/5.6 keeps the dish sharp with a soft background, ISO 100–400 stays clean in daylight, and 1/125s or faster freezes a sauce drip or a burger flip.
How to Photograph Smoke (the BBQ Money Shot)
Smoke is what separates a snapshot from a story. It's also the thing most people can't seem to capture — they see thick smoke with their eyes, then nothing shows up in the photo. The fix comes down to contrast and timing.
 Backlit smoke rising off a sliced smoked brisket showing the pink smoke ring against a dark background
Backlight it against a dark background. Smoke is made of pale, wispy particles, so it only shows up when there's (a) a light source behind or to the side of it, and (b) a dark backdrop behind that. Position yourself so the smoke rises against the darkest thing in the scene — a shadowed wall, the black body of the smoker, a dim treeline — with light raking across it. Suddenly those ghostly ribbons appear.
Time the lid lift. The biggest, most photogenic billow happens the second you open the lid. A trick from competition cooks: "burp" the hood first — crack it open and shut once or twice so the first hard wave rolls up and away, then open it fully and shoot the clean, controlled cloud. (Bonus: it keeps smoke off your face and lens.)
The smoke ring — your edible badge of honor. That pink-to-coral band just under the bark isn't food coloring; it's chemistry. As Texas A&M University's meat scientists explain, nitric oxide produced when wood or charcoal burns binds with myoglobin in the meat's surface and locks in that rosy color. The reaction stops once the surface hits about 140°F, so a thick ring is genuine proof of low-and-slow smoking — and barbecue lovers look for it. To show it off: slice fresh, light the cut face from the side so the ring catches a highlight, and get close enough that the ring, bark, and marbling all read clearly.
Protect your gear. Smoke and grease smear a lens fast. Shoot from upwind, keep a microfiber cloth in your pocket, and wipe the lens between cooks.
One honest note: smoke is fleeting and uncooperative. If you missed the billow or the ring photographs faint, you don't have to relight the pit — a tool like FoodShot's AI BBQ photography styles can add believable smoke and richen a faint smoke ring on a real photo of your cook (more on that below).
Meat-by-Meat: Shooting Each BBQ Cut
Every cut has a "best angle." Here's how to flatter each one.
 Overhead flat-lay BBQ platter with brisket, ribs, sausage and colorful sides on a metal tray, barbecue photos
Brisket. Slice against the grain, fan the slices, and shoot the cross-section so the smoke ring and bark are the stars. A low three-quarter angle shows the height of a fatty slice and that signature jiggle.
Ribs. Always bone-in and proud. Show the "bend" by lifting a rack so it bows (proof of tenderness), or stack and fan a rack so each bone reads. Catch the glaze while it's wet and glossy, and let side light pick out the dry-rub crust.
Pulled pork. It's all about the pile. Mound it tall, pull a few strands loose for texture, and mix in dark bark bits and the occasional crispy edge. A little rising steam sells the "just-pulled" freshness.
Burgers. Go low and tight. Shoot at a near-eye-level angle to stack the layers — charred patty, cheese melting mid-drip, toppings, sesame bun. The char on the patty edge and a glossy cheese pull do the selling. (We go deep on this in our burger photography breakdown.)
Smoked chicken. The win is the skin — that lacquered, mahogany, slightly crisp surface. Light it to catch the glisten, and show a clean bite or a pulled quarter to reveal the juicy meat underneath. Our smoked chicken photography guide has more on taming that tricky chicken skin.
Grilled vegetables. Veg is your secret weapon against brown-on-brown. Charred corn, blistered peppers, and zucchini with crosshatch marks add color, char lines, and freshness to any plate or platter.
Whole hog & showpieces. Go big. A whole hog, a tomahawk, or a full packer brisket deserves a hero shot — wide enough to show scale, with the pit, embers, or crackling skin in frame for drama. This is your "wow" image for the top of a menu or a website banner.
BBQ Sauce Photography: Gloss, Brush & Drip
Sauce is liquid flavor, and on camera a glossy coat of barbecue sauce is all about the shine. A freshly sauced surface reads as juicy and craveable; a dry, dull one reads as leftover.
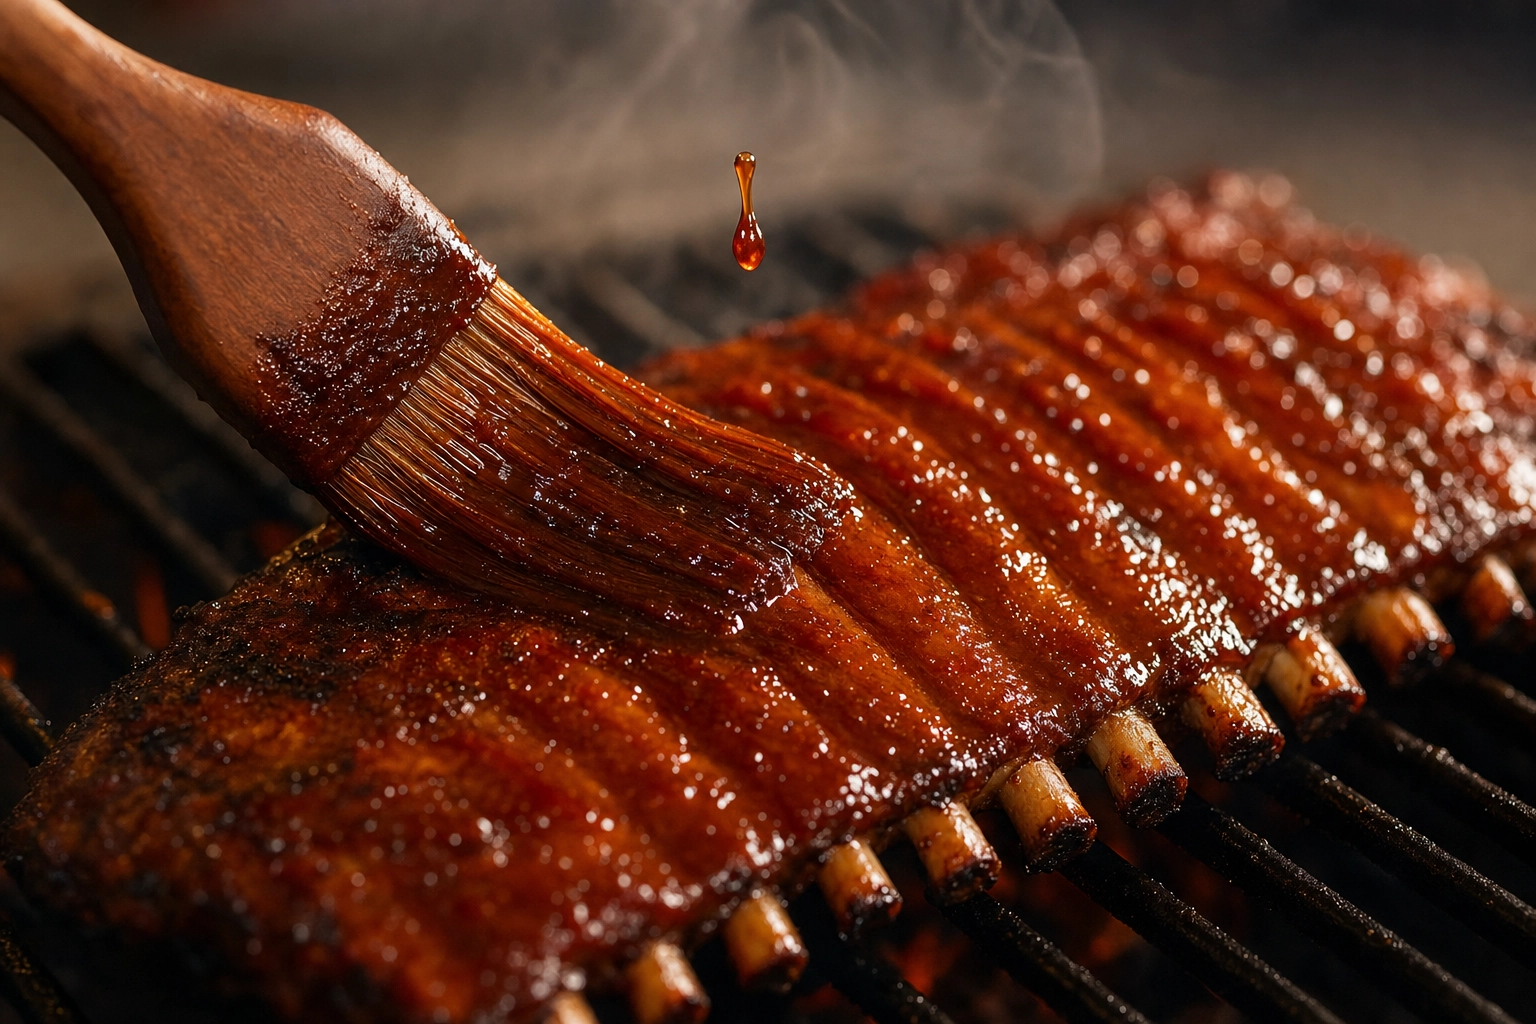 Basting brush spreading glossy barbecue sauce over a rack of ribs with a sauce drip, BBQ sauce photography
- Shoot it wet. Sauce right after you apply it, while it's still glossy. If it's drying out, brush on a fresh coat just before the shot.
- The brush stroke. A lacquered mop or basting brush dragged across a rack of ribs, caught with side light, gives you that pro "sauce in motion" look, with highlights running along the ridges.
- The drip and pour. Pouring or drizzling sauce mid-air adds energy and appetite appeal. Use a fast shutter (1/250s or faster) to freeze the falling sauce into a crisp ribbon instead of a blur.
- Mind the highlights. Glossy sauce can blow out into white blobs under hard light. Soft, diffused light keeps the sheen looking rich and glassy rather than washed out.
Outdoor vs. Indoor BBQ Photography
Most barbecue businesses end up needing both. Here's how they differ and when to use each.
Outdoor (at the pit):
- Real flame, real smoke, and free natural light.
- Authentic outdoor lifestyle context — the wood pile, the smoker, hands at work.
- Perfect for action shots, outdoor process content, and social storytelling.
- The downsides: wind blows smoke onto your lens, the light changes by the minute, weather doesn't cooperate, and you usually can't pause a live cook or a dinner rush to style a shot.
Indoor / studio:
- Total control over light, background, and consistency.
- A repeatable look across an entire menu — every item matches.
- Cleaner for menu boards, delivery apps, and catering decks.
- The trade-off: you lose the live-fire ambiance, and it takes more setup, props, and time.
The simple rule: shoot lifestyle and process outdoors at the pit, and shoot clean menu and delivery images in a controlled setting. If running two separate shoots sounds like a lot — it is. That's exactly the gap AI fills.
The AI Shortcut: Pitmaster-Grade Photos in 90 Seconds
Here's the reality of running a BBQ business: your best light is golden hour, but that's also your dinner rush. The brisket's ready at 11 a.m. under flat kitchen lights. The smoke didn't billow on cue. And on a phone screen, your gorgeous cook looks brown-on-brown and dull. You don't have time to relight the pit or book a photographer.
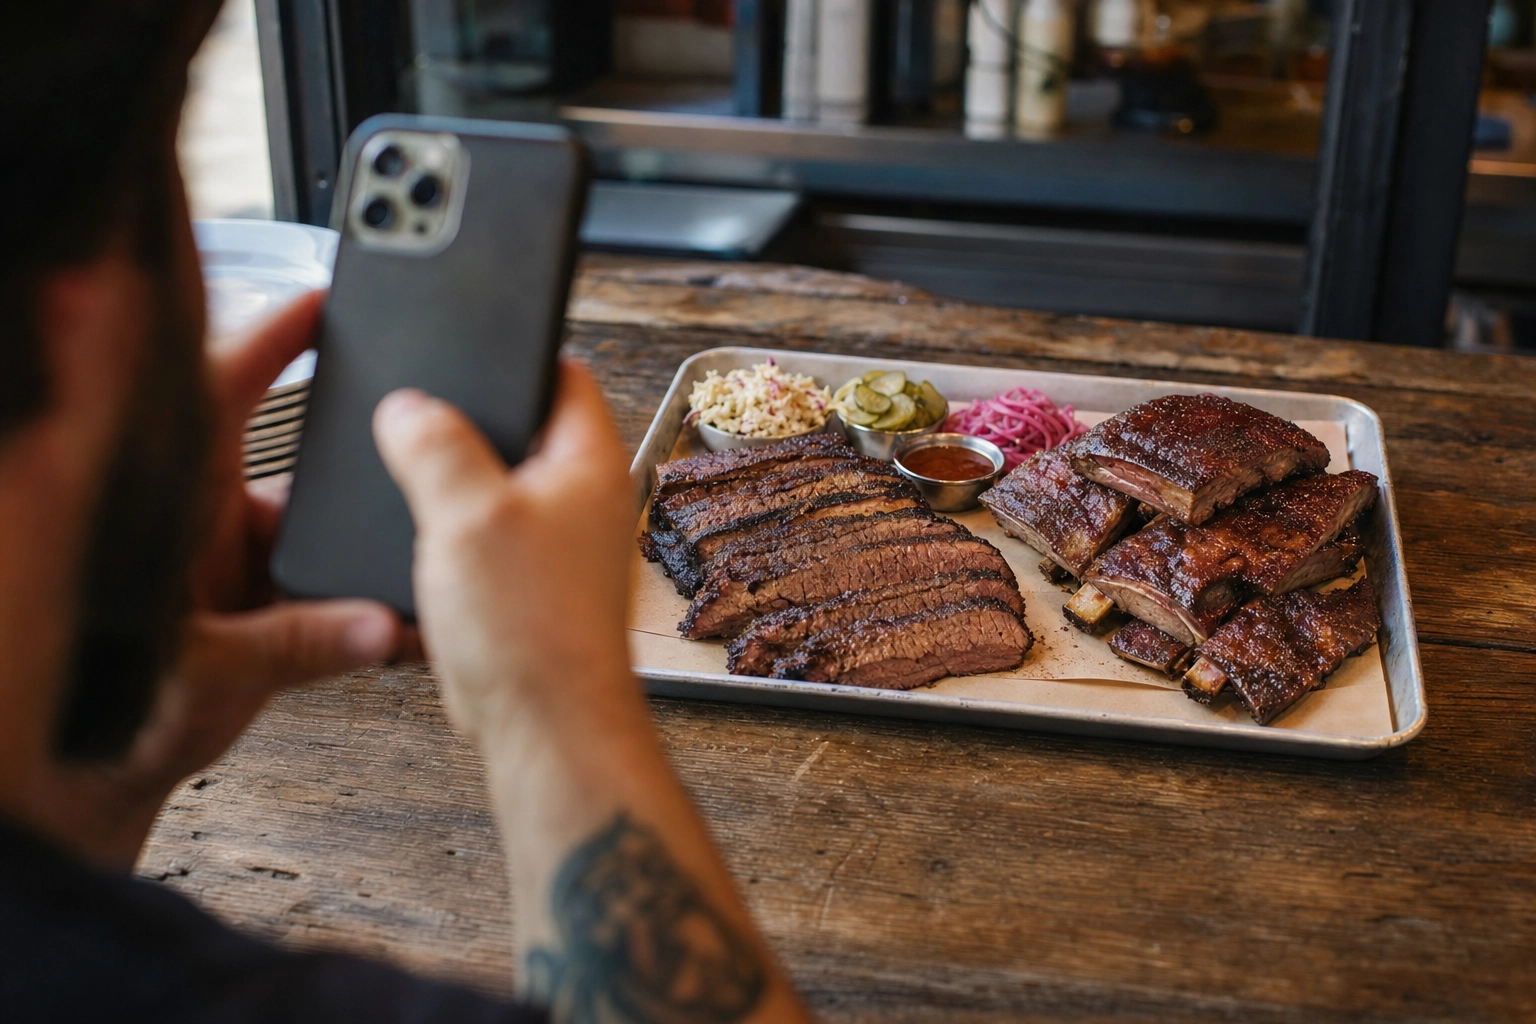 Hands using a smartphone to photograph a tray of brisket and ribs on a wooden table in natural light
That's where FoodShot AI comes in. Snap a normal phone photo of your actual food, upload it, and pick a BBQ or Grill style — FoodShot transforms it into a studio-quality, menu-ready barbecue shot in about 90 seconds, at roughly 95% less than the cost of a professional food photography shoot.
Because it's built for exactly this problem, it knows barbecue:
- Rescues brown-on-brown — adds the depth, contrast, and directional light that makes dark meat look rich instead of muddy.
- Brings back smoke and the smoke ring — adds believable rising smoke and richens a faint ring on a real slice.
- Nails the gloss — makes sauce and bark glisten without blowing out the highlights.
- Keeps your whole menu consistent — use My Styles to lock one smokehouse look across 40 items, and Builder Mode to swap backgrounds, boards, and surfaces.
- Outputs 4K with a commercial license, generates multiple variations from one snap, and processes in bulk when you've got a full menu to shoot.
One honest point: FoodShot enhances a real photo of real food — it doesn't invent dishes from thin air. You bring the cook; it brings the studio. The results are ready for your menu, DoorDash, Uber Eats, Instagram, or a food truck menu board, and they're built to match what you actually serve.
Plans start free (3 watermarked credits to test it), with commercial-license plans from $9/month — see pricing for the full breakdown.
Frequently Asked Questions
How do I capture smoke in BBQ photos?
Backlight it. Position the smoke so it rises against a dark background — a shadowed wall, the black smoker body, a dim treeline — with light coming from the side or behind. Shoot the moment you lift the lid (and "burp" the hood first so the billow is clean), and drag your exposure down slightly so the smoke doesn't blow out. If you missed it, FoodShot's BBQ style can add realistic smoke to a real photo of your cook.
Why does my BBQ meat look dark and muddy in photos?
This is the classic "brown-on-brown" problem — barbecue is naturally dark and monochromatic, so phones struggle with it. Fix it three ways: use soft, directional light (golden hour or window light) instead of flash; add color contrast with sides, pickles, herbs, or pink butcher paper; and expose for the meat, not the bright background. In editing, lift the shadows slightly and nudge up the reds, oranges, and contrast so the grilled meat looks caramelized instead of gray. An AI food editor can do all of this automatically in seconds.
How do I get sharp grill-mark detail?
Get physically close (never digital-zoom), tap to focus directly on the char, and use side light so the ridges of each grill mark cast a tiny shadow. Steady the camera or rest your elbows so the shot is tack-sharp, and take a few frames to be safe. Crisp focus on the crust is what makes grill marks look like they're sizzling rather than flat.
What's the best time of day to photograph grilling outdoors?
Golden hour — roughly the hour before sunset — gives you warm, soft, flattering light that makes grilled food glow. An overcast sky is a close second, because the clouds diffuse the light evenly. Avoid harsh midday sun, which creates hard shadows and ugly contrast on the food.
Do I need a professional camera for barbecue photography?
No. A modern smartphone takes excellent BBQ photos when you give it good light, get in close, and skip the flash. Technique and lighting matter far more than gear — that's true for all food photography, and doubly so for grilling photography. And if the final image still isn't menu-ready, an AI food photo editor can turn that phone snap into a studio-quality shot — no DSLR or professional photographer required.
Ready to make every cook look as good as it tastes? Turn a quick phone photo into pitmaster-grade, menu-ready BBQ photography in about 90 seconds with FoodShot AI — no studio, no photographer, no flat brown brisket. Start free and see your first shot in 90 seconds.